Forms:
Form is a mechanism
that allows typing information in to fields on a browser screen and submits
that information to a web server. Using
interactive web pages can be created so a form fill out and can be submitted
and can be achieved required results.
Form can be using for gathering information about a user, conducting
survey, registration etc.
Form tag (<form>):
The begging and
ending tags of the form creation are <form>, </form>. All of the values assigned to items between
this tags.
Form input tags:
Form input tag is
used to generate a various types of input tags such as
1. Text boxes
2. Check boxes
3. Radio buttons
4. Action button
5. File upload box
Text Boxes:
A rectangular
shaped field in which a user can enter test is called a text box. A text box is produced using the input tag
and specifying the appropriate attribute.
Example:
<input type=”text” name=”name” value=”10”>
Here
The value assigned to the type attribute is ‘text’. This is used for producing a text box.
The name attribute
specifies name of the parameter that can be assigned the value that the user
enter to field.
The value attribute
used to provide an initial value inside the control
We can also use “size” attribute it will allows to specify
the width of the text input control in terms of characters and also we will use
“maxlength” it allows to specify the maximum number of characters a user can
enter into the text box.
Program:
<html>
<head>
<title>text box</title>
</head>
<body>
<form>
NAME<input type=”text” name=”name”> <br>
DOB<input type=”text” name=”age”>
</form>
</body>
</html>
Output:
Check box:
A check box is
represented by a icon that the user can select or deselect by clicking on it.
Example:
Mathematics<input type=”checkbox” name=”subjects”>
Statistics<input type=”checkbox” name=”subjects”>
Computers<input type=”checkbox” name=”subjects”>
Program:
<html>
<head>
<title>check box</title>
</head>
<body>
<form>
Favorite subject <br>
<input type="checkbox" name="maths"
> Maths<br>
<input type="checkbox"
name="physics"> Physics<br>
<input type="checkbox"
name="computers"> computers
</form>
</body>
</html>
Output:
Radio Buttons:
The radio buttons
were designed such that only one button would be depressed at a given
time. Pushing in one button forced the
currently selected button to deselected.
Example:
OBC<input type=”radio” name=”cast”>
OC<input type=”radio” name=”cast”>
SC<input type=”radio” name=”cast”>
Program;
<html>
<head>
<title>Radio Box</title>
</head>
<body>
<form>
<input type="radio" name="cast">
OBC
<input type="radio" name="cast">
OC
<input type="radio" name="cast">
SC
</form>
</body>
</html>
Output:
Select button:
A select box, also
called drop down box. The starting and ending tags are <select>,
</select>. On this tags by using option tag (<option>) we can give
the options in the form of drop down list.
Example:
<select>
<option>male</option>
<option>female</option>
<option>others</option>
</select>
Program:
<html>
<head>
<title>Select Box</title>
</head>
<body>
<form>
<select>
<option value="Male"
selected>Male</option>
<option value="female">female</option>
<option value="others">others</option>
</select>
</form>
</body>
</html>
Ootput:
Password:
By using this we
can generate password in a text box.
Example:
<input type=”password” name=”name”>
Program:
<html>
<head>
<title>Password</title>
</head>
<body>
<form >
User ID :<input type="text"
name="userid"><br>
Password:<input type="password"
name="password">
</form>
</body>
</html>
Output:
Action button:
There are two types
of action buttons they are:
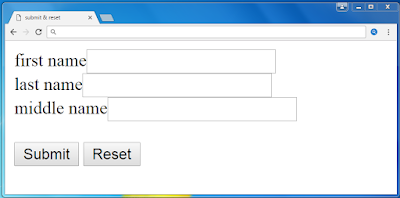
1.Submit
2. Reset
The user click on submit button the value that have entered
into the form are send to the web server.
The reset button is to allow the user to clear all the input data.
<input type=”submit” values=”submit”>
<input type=”reset” values=”reset”>
Program:
<html>
<head>
<title>File Upload Box</title>
</head>
<body>
<form>
first name<input type="text"
name="name"><br>
last name<input type="text"
name="name"><br>
middle name<input type="text"
name="name"><br><br>
<input type="submit" name="submit"
value="Submit">
<input type="reset" name="reset" value="Reset">
</form>
</body>
</html>
Output:
File upload Box:
If you want to allow a user to upload a file to your web
site, you will need to use a file upload box.
<input type=”file” name=”upload” accept=”image”>
Program:
<html>
<head>
<title>File Upload Box</title>
</head>
<body>
<form>
<input type="file" name="fileupload"
accept="image/*">
</form>
</body>
</html>
Output:


